
Mold Design Cost Explained: From $500 Prototypes to $5,000+ Production Tools
Mold making
Rapid prototyping costs anywhere from $50 for a basic 3D printed part to several thousand for complex, multi-step builds. The final price comes down to the prototyping method used (eg. FDM, SLA, SLS, CNC), material choice, part size, surface finish, and how much post-processing the parts need. Most single-part prototypes for early-stage testing cost between $80 and $500. The price can be reduced by cleaning up your CAD file, skipping cosmetic finishes on early rounds, and picking the right process for the job instead of defaulting to the most expensive option like many prototyping companies do to increase their bottom line.
We understand that most people looking for a price guide for rapid prototyping don’t want irrelevant info. You want to know how expensive it will be, what affects that price, and how to get your prototype done fast without wasting time or blowing the budget. That’s where this guide comes in.
We wrote this guide for engineers, product designers, and teams who don’t have time to guess and aren’t sure where to start. You’ll find real numbers, straight-up comparisons, and simple ways to cut down expenses without cutting corners. We have also put together a quiz for you (find it directly under the key takeaways section) to help you decide what type of prototype will best fit your needs.
If you want to go straight to the source to talk about your project, give us a call on 1-888-202-2052 or get in touch with us. We’ve helped clients across North America go from initial idea to physical prototype in days, not weeks. We offer vacuum casting, 3D printing, CNC machining, and mold making all in one place. Get in touch for a fast quote, clear advice, and consistent results. We’re happy to talk you through your project, even if we don’t end up working together.
Want to know which prototyping method will work best for your part? Answer a few questions below and find out!
“The ability to fail fast and cheaply is what separates companies that ship on time from those that don’t. Rapid prototyping compresses that failure cycle from months to days.” ~ Eric Ries, author of The Lean Startup
Rapid prototyping helps companies move faster in the product development process. You can turn ideas into realistic proofs of concept and test product properties before mass production. It lets you build high-fidelity prototypes that look and work like final products. You’ll catch problems early, reduce or eliminate rework, and avoid wasting time. Whether you’re using fused deposition modeling or selective laser sintering, the goal stays the same. Create prototypes quickly, test them, and move to the next phase knowing your mass production run is exactly what you want.
The price of a 3D printed prototype depends on print time, material, and surface finish. Prices can start around $50 but climb fast if you’re printing large parts or want metal parts 3D printed. Desktop 3D printers are cheaper but limited, and there’s a steep learning curve and time cost in figuring out 3D modeling and printing for yourself, especially for one-off parts. For parts that need to look and work like the final product, pro machines are better. Use lattice structures to lower expenses and weight.
| Factor | Impact on Price |
|---|---|
| Material type | Resin costs more |
| Surface finish | Increases labor time |
| Print size | More material, more expensive |
| Infill structure | Lattice saves weight |
Rapid prototyping prices can vary based on the tool, machine time, design complexity, and volume. A single early-stage model might cost $80, while multiple parts manufactured in a batch bring the total price down. The prototyping process also changes things, CNC machining often costs more than 3D printing for one-offs. Additive manufacturing helps reduce setup but still depends on material and finish. You won’t get a clear price without these details. Recently, we’ve been using vacuum casting for almost all prototypes as it gives a better result than 3D printing.
Some tips for keeping costs down:
There are a few things that can push your additive manufacturing expenses up fast. Parts that need tight accuracy or support heavy loads often take longer to print, especially in SLA or SL machines. If you outsource every stage, you pay for setup, handling, and changes made after an early iteration. Some teams switch to injection molding too early and spend more than needed for a simple proof of concept. A better approach is to match the part to the right method and avoid extra steps that increase cost unnecessarily.
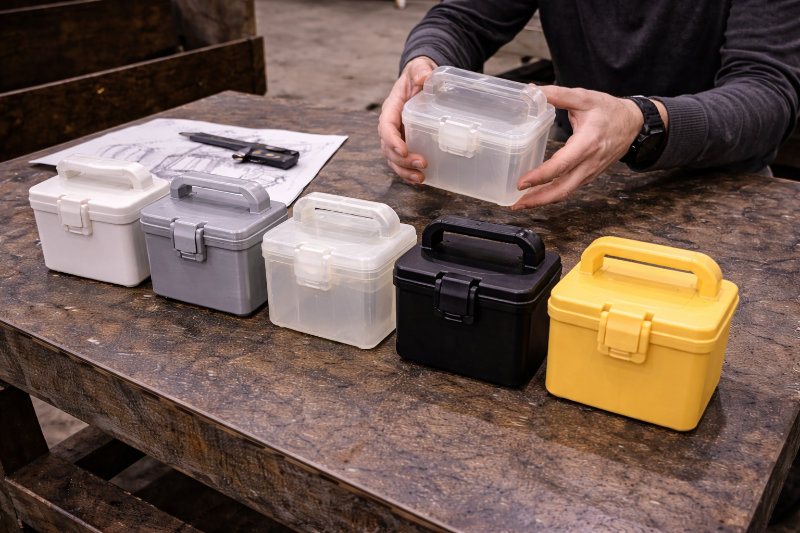
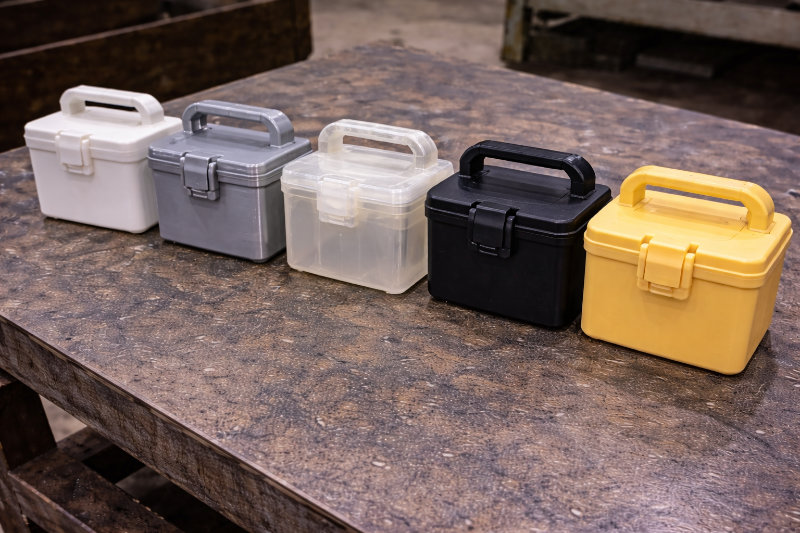
A prototype of the same product in different materials
A lot of teams pick one prototyping method and stick with it across the whole project. In our experience that’s a mistake. We’ve seen clients cut their spend by 30-40% just by switching processes between iterations. Eg. Print the first version in FDM to check fit and form. Then move to SLA or CNC for the version that needs to hold up under real testing. There’s no rule that says every round of iteratoins has to come off the same machine. The teams that treat prototyping like a toolkit instead of a single track get to validation faster and spend less getting there.
Also, not every prototyping method gives you the same results. Some machines are fast but rough, others offer better detail with longer lead time. Prototyping with 3D printing works well for low runs, while CNC machining fits stronger, high-load parts. If you need better finish, SLA or SLS or vacuum casting might be your best option. Each choice affects total expense and delivery.
Some common rapid prototyping processes and their use cases include:
Bad CAD files waste time and raise your prototyping expenses. One missing radius or unsupported wall can mess up the toolpath or break a part mid-run. Additive manufacturing methods like SLA or SLS are less forgiving with thin or floating features. If your team works directly from computer-aided designs, keep your tolerances tight and formats clean. A good file reduces lead time, scrap, and changes later. If you work with us, we’ll check your file before printing to avoid rework. We have lots of experiences, so can easily spot issues others miss.
Use neutral STL, IGES, or STEP files. It’s also a good idea, to always preview your file before sending it out too.

Post-processing can shift your final price more than you think. Cleaning, sanding, painting, or curing takes time and adds labor costs. If your proof of concept needs a specific surface finish or tight tolerance, that means extra steps. Extra steps = extra time and extra cost. It doesn’t matter if you’re using additive manufacturing or subtractive methods, the post-processing phase matters. This is where you lose money if you skip planning or try and rush the process. Long print runs or bad orientation also lead to more cleanup being required.
Some post-processing steps that increase cost include: Support removal, surface smoothing, painting or coating and final curing time.
Clients usually focus on material costs and machine time, but the biggest line item on most prototyping projects is revisions. Every time a part goes back for changes, you’re paying for setup again, new material and more more post-processing. As an example, one client came to us after four failed rounds with another prototyping shop. The geometry was fine. The problem was that nobody had checked wall thickness against the selected process before hitting print. That single oversight cost them three weeks and over $1,200 in wasted builds. Catching those issues before production starts is where the real savings are.
J-CAD Inc. recommendation: If you’re running fewer than 10 prototype cycles a year, outsourcing almost always makes more financial sense. The cost of maintaining machines, buying materials in small quantities, and training operators / hiring CAD designers adds up quickly. We work with teams who tried the in-house route and ended up spending more per part and more time than they would have hiring us. Send us your file and we’ll quote it within 24 hours so you can compare the numbers yourself, we think you’ll be pleasantly surprised!
If you’re working under pressure, it make sense to outsource. Managing machines, materials, and operators in-house takes time. Outsourcing to a shop like JCAD Inc. means shorter lead time and fewer issues. We can usually turn your prototype around in days, not weeks or months. We’ve already handled the setups, testing, and cleanup. You just send the file and get parts that match your specs. That’s faster than trying to dial in a new 3D printer or CNC router with every round.
The price of rapid prototyping includes more than just device time. When you hire a service provider, you’re paying for setup, handling, material prep, and part inspection. Some shops may also include packaging or dimensional reports. If you’re comparing quotes, check what’s covered.
| Service Stage | What You Get |
|---|---|
| Setup and prep | File check, support generation |
| Printing, vacuum casting or machining | Part made using your selected method |
| Post-processing | Cleanup, sanding, cure |
| Quality Assurance check | Visual or dimensional inspection for any irregularities |
“Once achieved, maintaining relevance requires constant listening, questioning, prototyping and testing,” as Roger Spitz said.
Different industries handle prototyping needs in different ways. In medical device work, teams often use SLA to make high-fidelity prototypes that match production specs. Auto suppliers use CNC for stronger test parts. A consumer product team may go with vacuum casting to simulate real finishes without full tooling. These choices affect cost, speed, and testing results.
Common use-cases for prototyping processes:
“Most of the budget blowouts we see come down to one thing: teams picking a process before they’ve properly looked at the part. When you match the prototyping method to what the part actually needs to do, half the cost problems disappear before you even hit print.” ~ Jason Vander Griendt, CEO of J-CAD Inc.
J-CAD Inc. Pro Tip: Before you send a file for quoting, export it as an STL and open it in a free mesh viewer. Look for inverted normals, non-manifold edges, and walls thinner than 0.8mm. These are the problems that cause failed prints, and most clients don’t catch them until the part comes back wrong. Five minutes of checking saves days of back-and-forth. Or just send the file to us to check or get us to create it for you from scratch and you will know it will be right!
There are smart ways to lower your budget without losing function. Start by choosing the right rapid prototyping methods for your part. Avoid overcomplicated geometry. Use draft angles and reduce wall thickness where it makes sense if you can. Also consider skipping full finishing on early-stage models. Remember the goal of a prototype isn’t perfectoin, it’s getting fast feedback.
Way we can keep your budget lower:
Fixing mistakes after printing quickly burns time and money. To reduce the costs, lock in your requirements before sending your prototype off for creation. Validate the part with a digital review or low-res prototype first. That will give you fast feedback without full cleanup or tooling. Rapid prototyping can vary in price based on how often you repeat the process. One wrong angle might delay your launch because the prototype needs more iterations.
A tip from Jason, CEO of J-CAD Inc.: If you’re prototyping a part with snap fits, threads, or press-fit features, always print a small test section of just that feature first. Full parts are expensive to reprint when one joint doesn’t work. Isolating the tricky geometry and testing it on its own costs a fraction of a full build and tells you exactly what needs adjusting.
Not all rapid prototyping services are equal. To make sure the company you hire is a good fit, ask about lead time, material types, and file support. Some shops print directly from your CAD files, others need prep. Make sure they can handle your prototyping technique, especially for high-fidelity or functional parts. If they dodge questions about surface finish or tolerance, look elsewhere.
Some good questions to ask:
Our top recommendation for hiring: Ask any shop you’re evaluating to show you a part they’ve made in the same material and process you need. Photos on a website aren’t enough. You want to see surface quality, edge detail, and how they handle thin features. At JCAD, we’re happy to send sample parts or photos of past work in your specific material so you know what to expect before you commit.
J-CAD Inc. gives you fast quotes, clear timelines, and high-quality parts without long delays. We use both 3D printing, vacuum casting and CNC machining depending on your specs. Our team either checks or creates your CAD files before production to avoid issues that add cost later. You get functional parts for testing, not just looks. We can help guide you through each phase of product development with real advice, not vague promises, and we do everything in house, so no surprises!
Get in touch today on 1-888-202-2052 to talk about your project, we’d love to work with you!
It depends on the method, size, and finish. A basic part can be less than $100. Complex ones go into the hundreds or sometimes thousands. If you need tight tolerances or full post-processing, the price goes up.
It’s not always expensive, but the cost adds up when designs need high detail, long machine time, or custom materials. Changing the part mid-run also leads to wasted prints and higher spend.
FDM (fused deposition modeling, a common type of 3D printing) or vacuum casting is usually cheapest for simple parts. It works for quick fit checks or rough drafts. But it may not be strong enough or accurate for final stages.
Some ways to reduce prototyping costs include simplifying the design, picking the right prototyping method and skipping cosmetic finishes early on. Also, print one test part before committing to a batch production run.
3D printing is cheaper for short runs or detailed geometry. CNC makes sense for strong, testable parts but usually costs more upfront.

Jason Vander Griendt is a Mechanical Engineering Technician with years of experience working at major companies such as SNC Lavalin Inc, Hatch Ltd. Siemens and Gerdau Ameristeel. He is the CEO of JCAD – Inc., a company he started in 2006 after seeing a gap in the market for businesses who could assist clients through the entire product design and manufacturing process.
Jason has been featured in Forbes, has had his businesses analyzed and discussed in multiple start-up books, was a previous winner of the Notable8 Digital Innovator of the year award, and is a regular guest on business panels and podcasts. Email Jason at , or follow him on LinkedIn.